Report generation dialog allow selecting reports that can be generated and set additional parameter for reports.
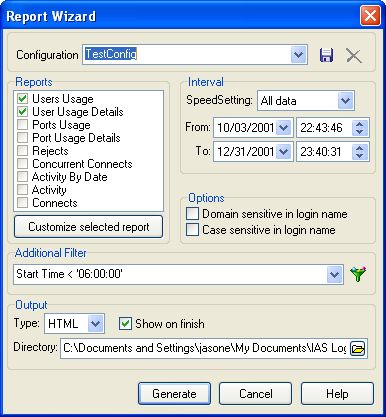
Available reports list “Reports” has all reports that can be generated using IAS Log Viewer. To generate report you must check it. Configure report’s interface, content and columns order can be also done using “customize selected report” button. Report interface configuration saves after IAS Log Viewer close.
Additional report parameters set.
Interval - allow to generate reports only for connects that match interval.
Domain sensitive in login name - this flag force IAS Log Viewer take into account domain name in reports generation. For example, if this flag is set to ON users Test\Ray and TestDomain\Ray detected as different and if this flag is set to OFF they detected as as similar.
Case sensitive in login name - this flag force IAS Log Viewer use register in user names. For example, if this flag is set to ON users “Ray” and “ray” detected as different and if this flag is set to OFF they detected as similar.
Additional filter - allow limit connects that is used for report generation. For example, you can set filter “Login Name like “ray”” and generate reports only for users “ray”. Read detailed information about filter creation and “filter builder” dialog here.
Report types.
IAS Log Viewer has 3 main report types:
- html report - very useful for view in Internet browser. If Show on finish flag is on report will be shown automatically in Internet browser after generating.
- xml report - useful for own reports generation using XSLT transformation technology.
- csv report - useful for view and analyze in MS Excel.
Generated report saves in folder defined in “Output directory” field.
Reports configurations
IAS Log Viewer has ability to save and use in future the most popular reports parameters. You need doing some steps for saving parameters:
- Select needed reports in “Reports wizard” dialog
- Set all additional report parameters
- Input saved configuration name in “Configuration” field and
click
 button to save selected configuration.
You can select this configuration in any moment from the configuration list and
all needed parameters will be set automatically. You just need to click
“Generate” button to generate reports! To remove unnecessary configuration you
must select it in configuration list and click  .
.